ShopDreamUp AI ArtDreamUp
Deviation Actions


Suggested Deviants
![[TUTO] How I Get My Lines](https://images-wixmp-ed30a86b8c4ca887773594c2.wixmp.com/f/af975a4f-6708-4444-9e15-66591b121538/db0itvn-02568855-5832-4fac-a5fa-492635ba0d18.png/v1/crop/w_184,h_184,x_0,y_140,scl_0.25449515905947,q_70,strp/_tuto__how_i_get_my_lines_by_newvoh_db0itvn-92s-2x.jpg?token=eyJ0eXAiOiJKV1QiLCJhbGciOiJIUzI1NiJ9.eyJzdWIiOiJ1cm46YXBwOjdlMGQxODg5ODIyNjQzNzNhNWYwZDQxNWVhMGQyNmUwIiwiaXNzIjoidXJuOmFwcDo3ZTBkMTg4OTgyMjY0MzczYTVmMGQ0MTVlYTBkMjZlMCIsIm9iaiI6W1t7ImhlaWdodCI6Ijw9MjkyOCIsInBhdGgiOiJcL2ZcL2FmOTc1YTRmLTY3MDgtNDQ0NC05ZTE1LTY2NTkxYjEyMTUzOFwvZGIwaXR2bi0wMjU2ODg1NS01ODMyLTRmYWMtYTVmYS00OTI2MzViYTBkMTgucG5nIiwid2lkdGgiOiI8PTcyMyJ9XV0sImF1ZCI6WyJ1cm46c2VydmljZTppbWFnZS5vcGVyYXRpb25zIl19.n7P-BA9DxYEeON9xrWuc6GkpN8AZzEaQvgxo1NbA4Lg)
![[TUTO] How I Get My Lines](https://images-wixmp-ed30a86b8c4ca887773594c2.wixmp.com/f/af975a4f-6708-4444-9e15-66591b121538/db0itvn-02568855-5832-4fac-a5fa-492635ba0d18.png/v1/crop/w_92,h_92,x_0,y_70,scl_0.12724757952974,q_70,strp/_tuto__how_i_get_my_lines_by_newvoh_db0itvn-92s.jpg?token=eyJ0eXAiOiJKV1QiLCJhbGciOiJIUzI1NiJ9.eyJzdWIiOiJ1cm46YXBwOjdlMGQxODg5ODIyNjQzNzNhNWYwZDQxNWVhMGQyNmUwIiwiaXNzIjoidXJuOmFwcDo3ZTBkMTg4OTgyMjY0MzczYTVmMGQ0MTVlYTBkMjZlMCIsIm9iaiI6W1t7ImhlaWdodCI6Ijw9MjkyOCIsInBhdGgiOiJcL2ZcL2FmOTc1YTRmLTY3MDgtNDQ0NC05ZTE1LTY2NTkxYjEyMTUzOFwvZGIwaXR2bi0wMjU2ODg1NS01ODMyLTRmYWMtYTVmYS00OTI2MzViYTBkMTgucG5nIiwid2lkdGgiOiI8PTcyMyJ9XV0sImF1ZCI6WyJ1cm46c2VydmljZTppbWFnZS5vcGVyYXRpb25zIl19.n7P-BA9DxYEeON9xrWuc6GkpN8AZzEaQvgxo1NbA4Lg)


![[SF] Ranch Horses | Beginners](https://images-wixmp-ed30a86b8c4ca887773594c2.wixmp.com/f/af975a4f-6708-4444-9e15-66591b121538/db0dsph-9b418dd4-3034-494f-a992-42da62c3751b.png/v1/crop/w_184,h_184,x_0,y_34,scl_0.21173762945915/_sf__ranch_horses___beginners_by_newvoh_db0dsph-92s-2x.png?token=eyJ0eXAiOiJKV1QiLCJhbGciOiJIUzI1NiJ9.eyJzdWIiOiJ1cm46YXBwOjdlMGQxODg5ODIyNjQzNzNhNWYwZDQxNWVhMGQyNmUwIiwiaXNzIjoidXJuOmFwcDo3ZTBkMTg4OTgyMjY0MzczYTVmMGQ0MTVlYTBkMjZlMCIsIm9iaiI6W1t7ImhlaWdodCI6Ijw9MTUxMyIsInBhdGgiOiJcL2ZcL2FmOTc1YTRmLTY3MDgtNDQ0NC05ZTE1LTY2NTkxYjEyMTUzOFwvZGIwZHNwaC05YjQxOGRkNC0zMDM0LTQ5NGYtYTk5Mi00MmRhNjJjMzc1MWIucG5nIiwid2lkdGgiOiI8PTg2OSJ9XV0sImF1ZCI6WyJ1cm46c2VydmljZTppbWFnZS5vcGVyYXRpb25zIl19.rQ3rgcCGibL3-2ovMvcCQVYPHQgh-906r38kBA4knzM)
![[SF] Ranch Horses | Beginners](https://images-wixmp-ed30a86b8c4ca887773594c2.wixmp.com/f/af975a4f-6708-4444-9e15-66591b121538/db0dsph-9b418dd4-3034-494f-a992-42da62c3751b.png/v1/crop/w_92,h_92,x_0,y_17,scl_0.10586881472957/_sf__ranch_horses___beginners_by_newvoh_db0dsph-92s.png?token=eyJ0eXAiOiJKV1QiLCJhbGciOiJIUzI1NiJ9.eyJzdWIiOiJ1cm46YXBwOjdlMGQxODg5ODIyNjQzNzNhNWYwZDQxNWVhMGQyNmUwIiwiaXNzIjoidXJuOmFwcDo3ZTBkMTg4OTgyMjY0MzczYTVmMGQ0MTVlYTBkMjZlMCIsIm9iaiI6W1t7ImhlaWdodCI6Ijw9MTUxMyIsInBhdGgiOiJcL2ZcL2FmOTc1YTRmLTY3MDgtNDQ0NC05ZTE1LTY2NTkxYjEyMTUzOFwvZGIwZHNwaC05YjQxOGRkNC0zMDM0LTQ5NGYtYTk5Mi00MmRhNjJjMzc1MWIucG5nIiwid2lkdGgiOiI8PTg2OSJ9XV0sImF1ZCI6WyJ1cm46c2VydmljZTppbWFnZS5vcGVyYXRpb25zIl19.rQ3rgcCGibL3-2ovMvcCQVYPHQgh-906r38kBA4knzM)


Suggested Collections


You Might Like…


Featured in Groups


Description
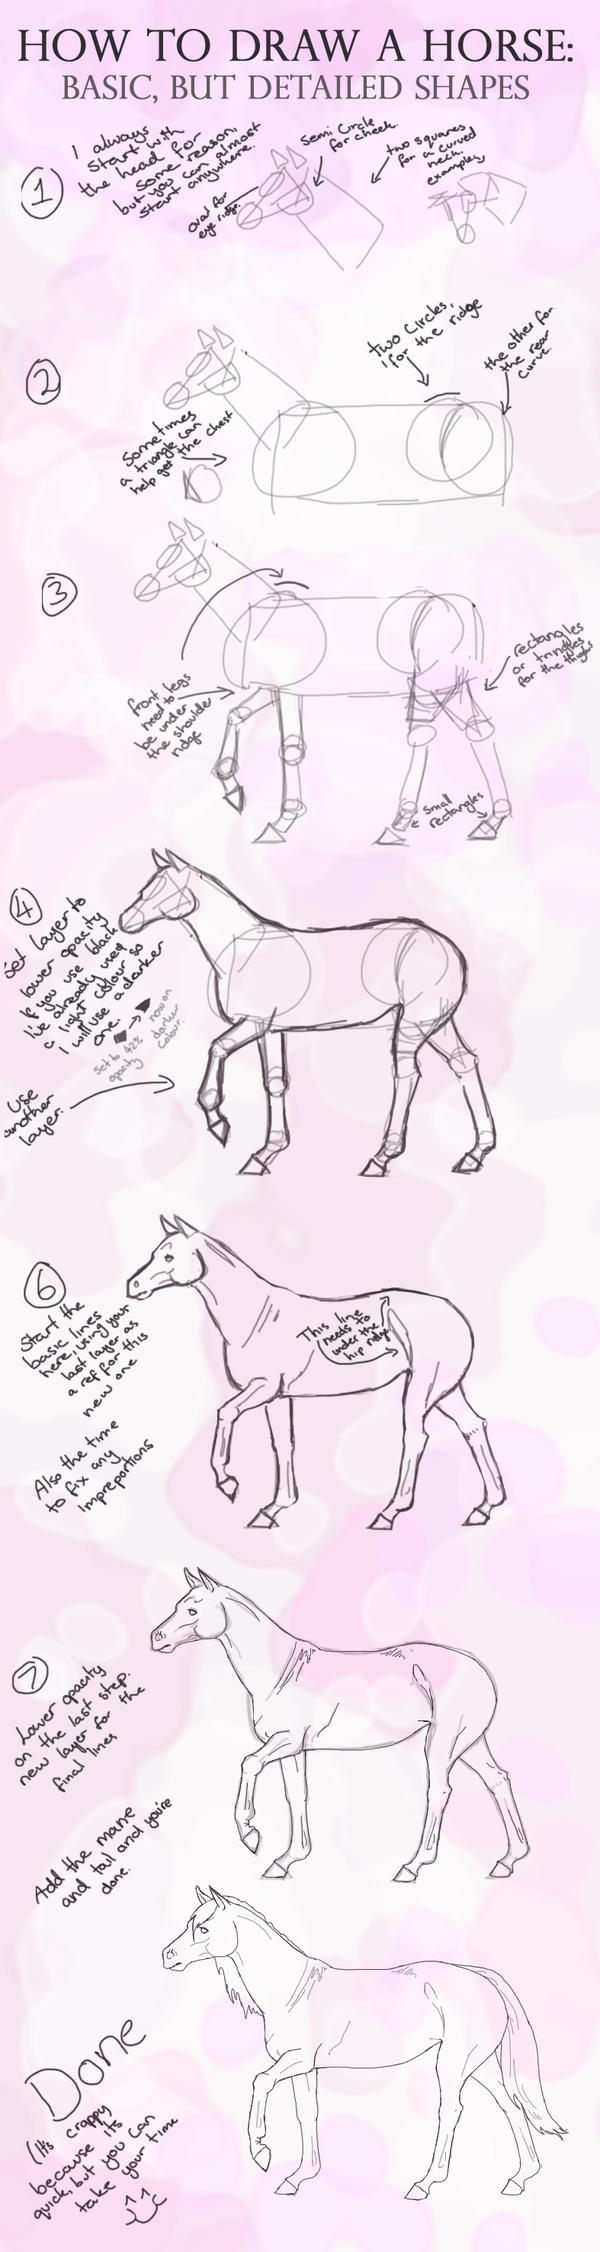
This is a quick tutorial i made to help people with the shapes of a horse. I try to keep to circles, ovals, triangles and rectangles. Keep in mine that the first few steps are Sketching, and don't need to be perfect circles at all.
This method is good for people who need want to learn how to draw horses but can figure out where things go. This can be implemented on horse doing just about anything from a side(ish) view. Can be done with a front view, but some shapes are changed.
Method:
Step 1: I start with the head and neck. First i have a semi circle for the cheekbone, than i do the triangle for the head, but you can swap those if you want. Next was the oval where the eye's ridge is, this can be avoided if the face is directly a side view. Circle for the muzzle, triangles for the ears. The neck need one long rectangle, or two squares overlapping if the neck curved a lot.
Step 2: Circle chest and square torso. I draw two circles (one more like an oval,) ones higher than the rectangle (slightly) to get the hip and the other is the get the roundness of the hind quarters. The top circle also makes a good place for the stomach line to come to later.
Step 3: The front legs need to start under the should ridge and go: rectangle, circle, rectangle, circle, rectangle, triangle. The back ones are similar, but the first rectangle can be replaced with a oval or triangle. These will be different per breed considering width and length.
Step 4: Now the basic lines are drawn on a new layer (the last one needs to be lowered in opacity.) Here you need to connect all the lines and curve the hard lines. See where the stomach comes up to the base of the higher circle on the rear? That's one of the advantages of doing two circles rather than one.
Step 5: Add detailed lines, such as the legs lines, or the muscle lines in the neck. The curve between the stomach and thigh needs to be drawn-it should line up with the hip bone.
Step 6:Using a thin brush on a new layer, trace your last horse while adding the last details. These lines should be able to be used as the line art for your horse, so put in every detail that you can. You can repeat this step several times if you need to fix things.
Step 7: Now add your mane and tail to finish the line art. All that left now is colouring it.
Hope this helps.
Minimal layers needed: 3 (if mane and tail doesn't need sketching.)
Time (for me to make this): 1 hour.
Programs it works in: Anything with layers
Horse Reference: None.
Image size
787x2953px 741.78 KB
© 2015 - 2024 AMillionLights
Comments4
Join the community to add your comment. Already a deviant? Log In
This guide looks awesome! I'm definitely using this to help my horse anatomy!